Stop Motion Animation - Step-by-Step Tutorial
Index | PlugItIn
| FireItUp | Record
| Playback | Saving
| Editing | Sound
| Titles | Output
QT | Output Tape
7 Adding Sound (from Sample File, from CD, from Mic)
Capturing sound from an Audio CD
![]() Insert an audio
CD into computer.
Insert an audio
CD into computer.

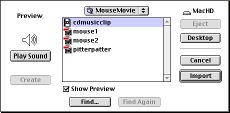
In Desktop Menu, select File>Import>File.
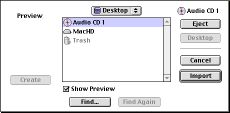
In the dialog box, navigate to the CD
on the desktop. Click "Import".
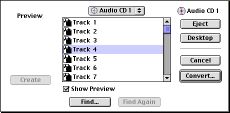
The Tracks on the CD will show up.
Select one and click "Convert".

Give the file a new name (unless
you like Track 4 Movie).Click
"Options".
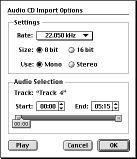
"Options" allows you to pick
the sound qualities. The options
above will create a smaller file.
If you want to convert the entire
Track, click OK. Or...
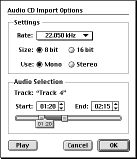
...if you want only a small portion
of the track, play the file and note the
times. Then enter Start & End time
parameters.Click OK.
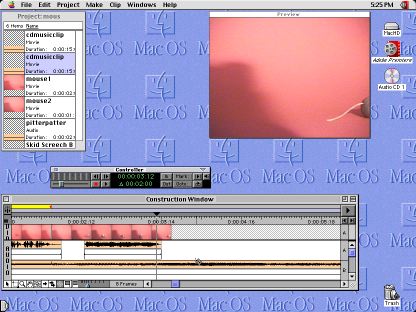
Import the new audio file into your Project.
To add another Audio Track (B), just pull down on the corner
of the Construction Window. Then drag your new CD music
clip onto Audio Track B.
Editing (cutting) Sound Tracks
![]()
To cut out parts of a clip, click once on the 'Razor" tool.
The cursor becomes a Razor. Postition it on a clip, then click to cut.

After cutting, click once on part to be removed.Then push Delete.

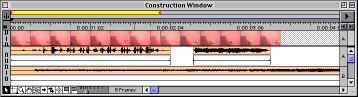
Changing the Volume of the Sound Track.

Move the cursor over the thin black volume line in the Sound Track.
The cursor pointer will become a small hand with a pointing finger.
Click once on the black line to create a Dot (a bend point).

Then move the cursor to another point on the volume line, click, hold and
drag the line up or down to change the volume. Play the movie to hear the
effect. in the above picture, the sound will Fade Out. Multiple Bend Points
cab be applied to a Sound Track. NOTE: To delete a Bend Point, drag it
out of the Construction window and release.
Index | PlugItIn | FireItUp | Record | Playback | Saving | Editing | Sound | Titles | Output QT | Output Tape